Activate Seclave
When Seclave is activated it initializes the device and the unit is being formatted. A master password will be created for your device, this master password consists of two words that you enter to open your Seclave.
Buttons
The Seclave has two buttons.
The power-switch can be found on the top right side of the Seclave.
The joystick is the large button next to the display, it can be moved in four directions and be pushed.

Activation
Turn on the Seclave by holding the power-switch and pressing the joystick.
Before the Seclave can be activated, randomness needs to be created. This is done by moving and pressing the joystick until the counter reaches zero.
When randomness has been generated the first of the words that make up the master password is displayed. Press right to see the second word. Make sure you remember these two words!
With the marker on the second word press the joystick to continue.
Enter your master password by finding the first letter in the first word by moving the joystick right and left. When the right letter is found press the joystick. Continue and complete the word by moving right and left and confirm your choice by pressing the joystick. Continue in the same way until both words are completed.
Repeat this and enter your password one more time and the Seclave will be formatted and ready to use.
Using the Seclave
When the Seclave is activated it’s ready to use.
Power up
To turn the Seclave on, hold the power-switch and press down the joystick as when you activated the device.
Power off
The Seclave can be powered off in almost all menus by holding the joystick up for 2 seconds. When the Seclave has been inactive for some time it will power-off automatically. In the main menu it’s 1 minute, in any sub-menu it’s 3 minutes and when the USB cable is connected it’s 5 minutes.
Note
There is a special mode called Active use which extends these timeouts, more about that later.
Passwords in Seclave
Seclave can hold up to 500 entries, each entry contains 5 fields.
Label is the name of the entry, up to 16 characters. The Label is used by the Seclave to organize the entry, it has to be unique.
Group is an optional grouping of entries, it’s possible to find your entries via the group, they can consist of up to 8 characters.
Username can be a username, card number or anything similar, can consist of up to 50 characters.
Password can be a password, PIN or anything that is used when logging in, can consist of up to 50 characters.
Optional, any additional information, like for example an account number or a date, can consist of up to 83 characters.
Add new entries manually
Choose New in the main menu to add a new entry.
Label
Use the right and left to scroll over the letters and press the joystick to choose a letter and choose [DEL] to remove a letter. Choose a unique descriptive label for the entry, when the label is built choose [DONE] to confirm and move on.
Group
Optionally set a group name, either enter a new (choose New) or choose between the available (choose Choose). The group name can be used to group certain types of password together and make it easier to find them later. You can always update these fields later.
Username
After a group is chosen you set a username for that entry. Usernames can have different types of letters:
[UPPER] select input of CAPITAL letters.
[LOWER] select input of lowercase letters.
[SYMB] select input of special characters and numbers.
Note
To insert a space choose [ ], which can be found in all modes.
Password
Passwords can be either entered in a similar fashion as usernames by choosing Enter password or generated using a set of pre-defined generators using Generate.
Generators available:
Word based create a password based upon N-number of words.
Choose entropy create a password with uppercase, lowercase and special characters with the minimum specified entropy.
Num. characters create a password with a specific number of characters using the same character set as Choose entropy.
PIN create a password with only digits.
Guide me! choose length of password depending on usage.
View entries
There are several ways to view passwords, depending on how you organize your passwords different views can be easiest to use. For example, imagine you have the following entries:
house_alarm the pin to your house alarm, this will probably only be accessed if you come back from a vacation when you forgot your alarm, this can be found using the Groups view under the group named alarm.
laptop_user the username and password to your laptop, is probably accessed seldom, can best be found in the View based on its label.
pgp_private the password to your PGP key, often used password, can best be found in Recent.
pgp_work the password to your work PGP key, can best be found in either Recent or group pgp.
Recent
The Recent view in the main menu presents all entries sorted by usage frequency, it is constantly updated to reflect the current usage.
View
The View menu lists all entries sorted by their label, in sub-menus based on their initial letter.
Groups
The Groups menu groups all entries with the same group in a sub-menu, within each group the entries are sorted according to their label.
Change passwords
In the Change menu it’s possible to change all of the fields in the entries. Choose which label you want to change.
Updating passwords
When updating a password you can have two passwords active and usable during the transition.
To update the password choose the Password item for that label and create a new password, by either choosing Generate or Enter password.
After a new temporary password is generated you enter a state where you can access both the old and new password until you back out of this menu (with joystick up) or choose Done or Abort.
When you choose Done you commit the new password and it will replace the old one, the old will not be accessible anymore. If you choose Abort the new password will be discarded and no new password will be set.
Usb slave
When entering Usb slave Seclave will expose a “virtual serial port” to the connecting computer.
In this mode the computer can issue commands which will query information from the Seclave, how much confirmation is needed on the Seclave will depend on the chosen access mode in the Admin/Usb slave menu, more on that later.
Backup
Under the menu Backup there is a set of functions to backup and restore Seclave units.
To read the information the backup key needs to be entered, it is displayed under Show key. To show the key you need to re-enter your login words. The key is unique for your activated Seclave, after every reactivation the backup key is changed. The backup file should be stored in a secure place where it is not lost or destroyed.
Note
The backup key should be written down and kept in a secure place, for example in a bank safe or similar.
Take backup
Connect the Seclave to the computer via the USB port.
When choosing Export it will show up on the computer as an USB device, like any USB memory, containing a file named SECLAVE.BKP. Copy this file to the computer with the Finder/Explorer.
Note
Remember that the backup is useless without the backup key!
Restore
Connect the Seclave to the computer via the USB port.
Enter Restore.
If you have entered a saved restore key you will have the option to use this when restoring from a backup, if you press Yes then the saved restore will be used. If you choose No then you will be asked to enter a backup key, then enter the backup key (32 characters). Confirm by pressing down and choose Done.
Restore from Seclave ver. 1
If you have a backup archive from a Seclave version 1, restore the backup into your new Seclave with the Legacy restore menu, using the same procedure as in Restore
Admin
T.B.D
Active use
Active use is a temporary mode where the Seclave has extended shutdown timeouts, the mode is exited when the Seclave shuts down.
This is accessed from the main menu in the Active use menu. Then in Active use there will be an exclamation mark shown in the screen to the left. The timeouts are controlled in Admin/Active use.
USB Slave
There is a mode USB slave which allows the computer to query the database of the Seclave via the USB interface.
The Seclave can be set to trust the computer at various levels, this permits the user to change the risk/convenience level according to his need.
There is a special set of entries which are controlled differently access control wise, this is the entries belonging to the wwwfill group. The entries in the wwwfill group are also called web passwords in this section. The access control level is set in Admin/Usb slave
The levels are:
Ask all
This mode will ask for confirmation on the Seclave for all operations, by presenting a text and waiting for the joystick to be pressed, push the joystick up if you want to disallow an operation.
Normal
This is the default mode. It will allow the computer to get and add web passwords from the Seclave without any need for user confirmation. For all other operations there will be a confirmation request in the Seclave which the user need to confirm.
Allow all
This mode allows all operations to be allowed without any confirmation, only use this mode in special situations where you can handle the risk, this essentially allows the computer to see all your passwords on the Seclave.
Note
Please note that you potentially increase the risk by using this mode.
Chrome integration
There is a plugin in Chrome which enables Chrome to access the Seclave via the Usb slave mode. The plugin is divided into a Chrome Extension and a Chrome Plugin, both need to be installed for the communication to work. These components are easily installed on the Chrome store.
Installation
Download and install Google Chrome
Install the following extensions to Google Chrome
Seclave Chrome App - handle the communication to seclave
Seclave Chrome Extension - autocomplete usernames and passwords while browsing
Note
The Seclave plugin doesn’t work in Incognito mode.
Offline installation
If the Chrome store is not a possible installation method the packages can be downloaded from:
And follow the instructions at https://developer.chrome.com/extensions/external_extensions.
Note
The ID of the extensions are lfcojjlamdinbfeiaklpogblagbankbh and jgphbappbepgkebjomdcfjepefkajnbn.
Microsoft Windows installation
Install legacy driver for device SECLAVE2 using the driver specification file seclave_acm.inf.
Linux installation
Note
tested on Ubuntu Linux
Download ubuntu_seclave2.tgz in /tmp.
Extract files in /tmp :
cd /tmp
tar xvzf ubuntu_seclave2.tgz
Run installation script:
cd /tmp/ubuntu_seclave2
sudo ./install.sh
This will:
Add new group seclave.
Adds a user to that group.
Install udev rule that makes the Seclave virtual serial port accessible to the Chrome App and prevent NetworkManager to use the device as a modem.
Restart the udev service and logout the user, or restart the system.
Introduction
When installed properly there should be a Seclave icon on the right side of the address bar, this icon shows the current status and is also the access to Seclave control interface.
Status icon
The status icon has different color depending on the current state.
Red background - this indicates that the Seclave Chrome Extension is working but it can’t communicate with Seclave Chrome App.
Green check on uncolored background - the Seclave is in Usb slave mode and connected.
Yellow background - the Seclave is asking for user confirmation.
Web passwords
The Chrome plugin’s main interaction is with the web passwords, these are the passwords that are in the wwwfill group, this group is treated differently on the Seclave.
Web passwords have a domain, a username and a password field. The label is constructed uniquely by using the first part of the domain and 3 random characters/numbers at the end, then the full domain is encoded into the optional field. One domain can have several username/password pairs mapped to it.
So these passwords can be seen on the Seclave as any other password, but it can also be accessed via the Usb slave mode.
Usage
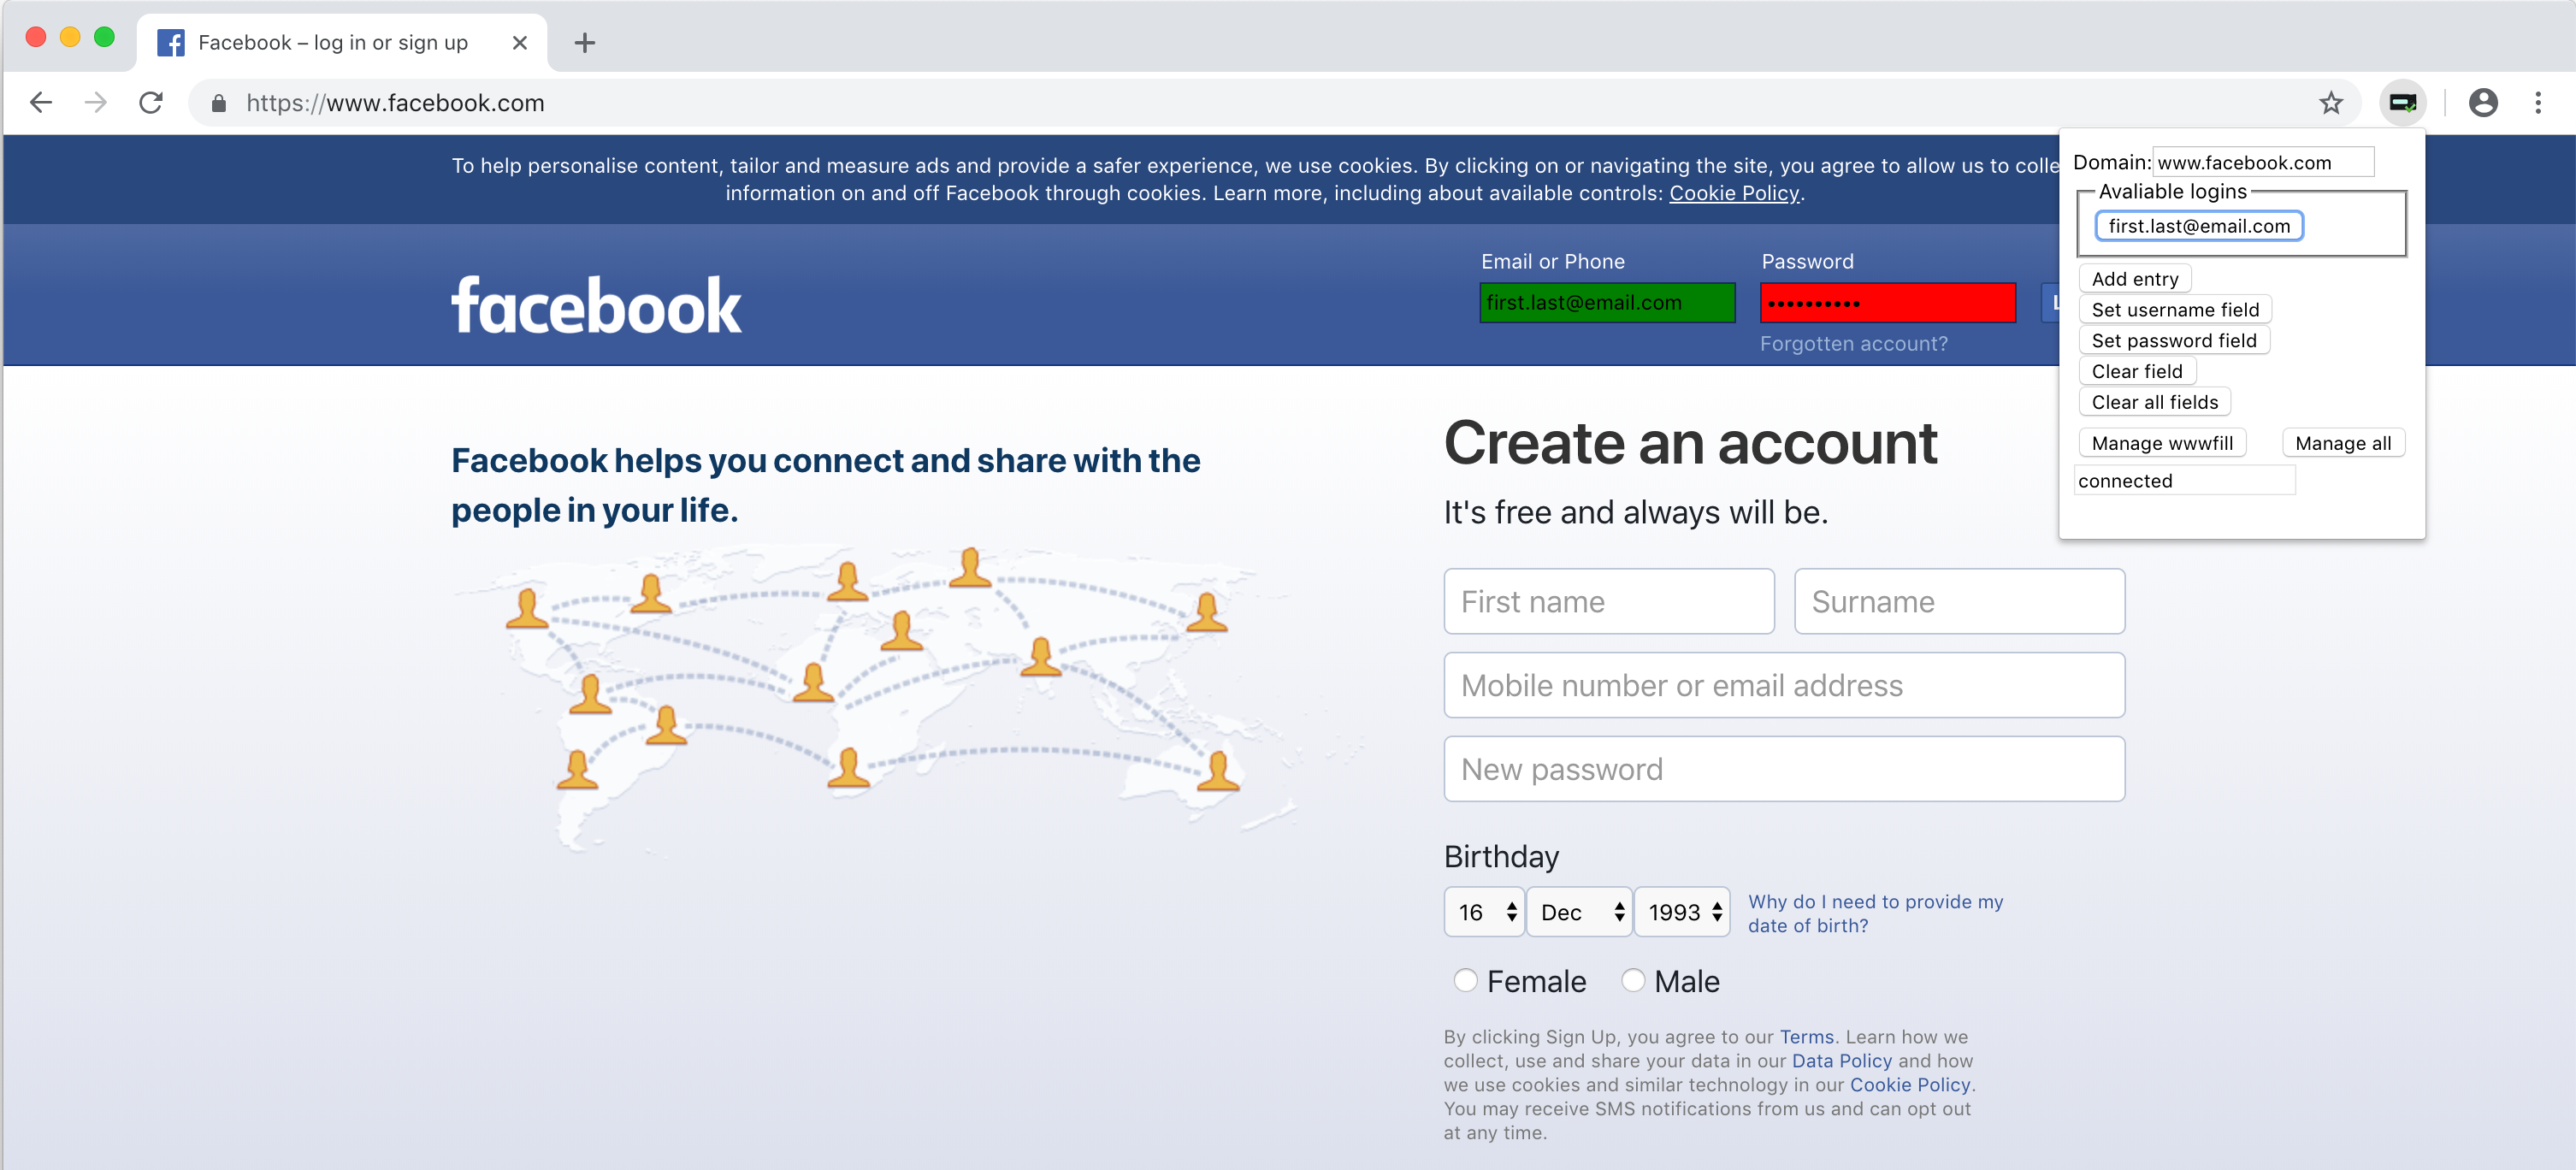
When you are visiting a page and opening up the Seclave plugin by clicking the Seclave icon right of the addressbar the plugin will query the Seclave if the current domain is available in the database. If there exist wwwfill entries in the Seclave on this domain they will show up in the Available logins field.
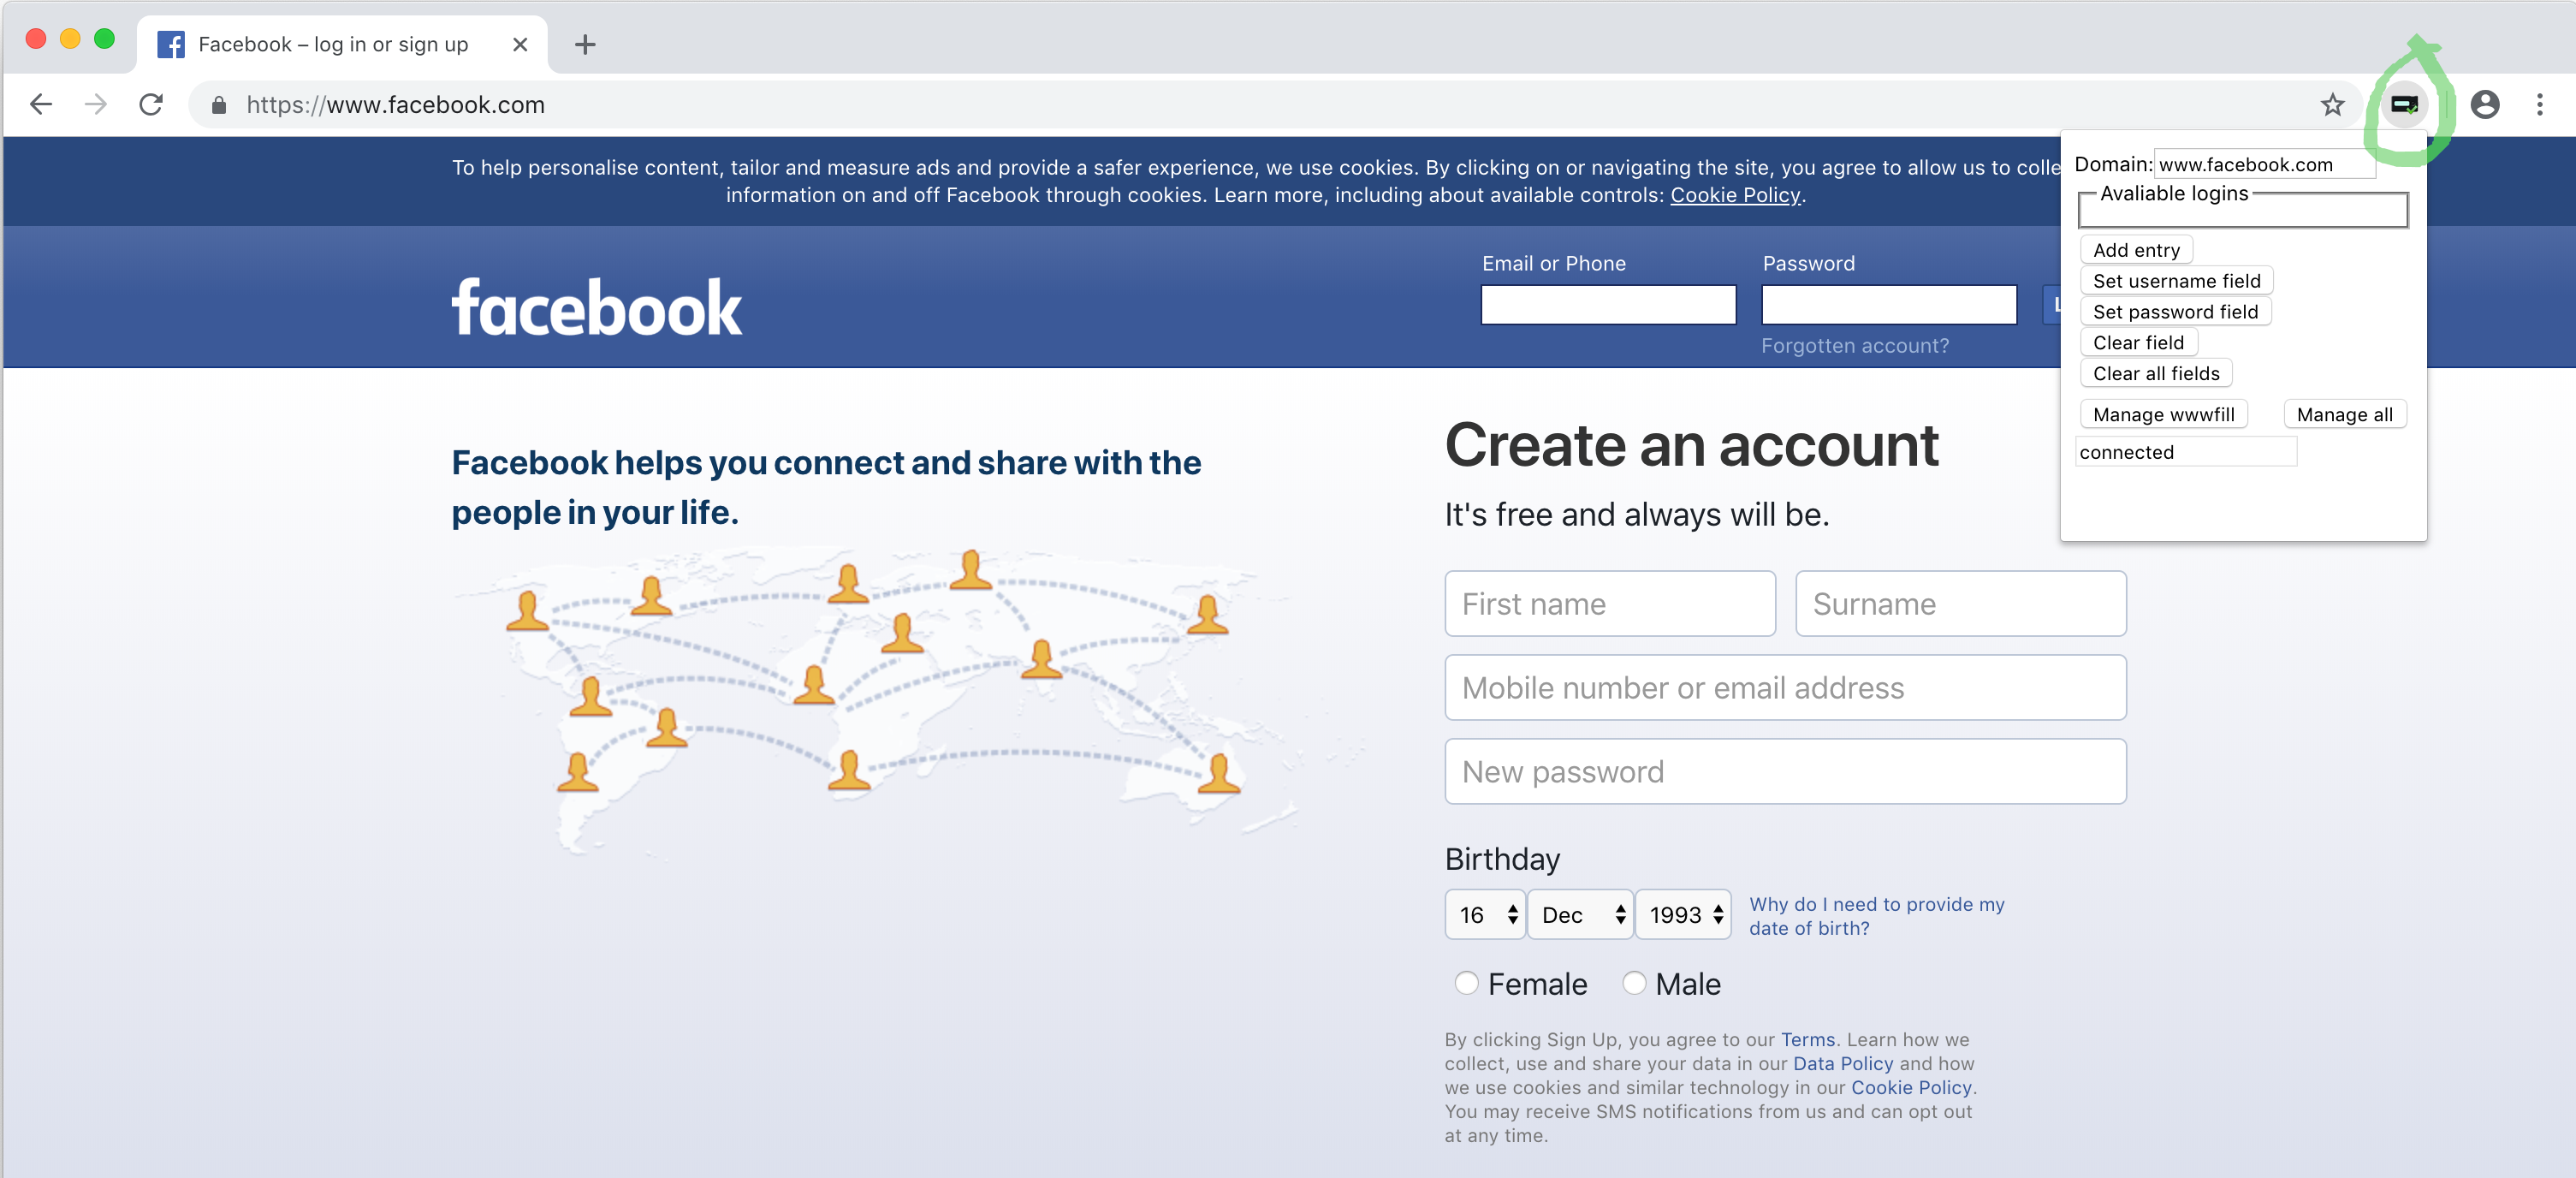
Input fields
It’s possible to choose which web form fields that should be mapped to the username and password of an wwwfill entry.
To specify a field as a username or password field, click on that field so it’s activated.
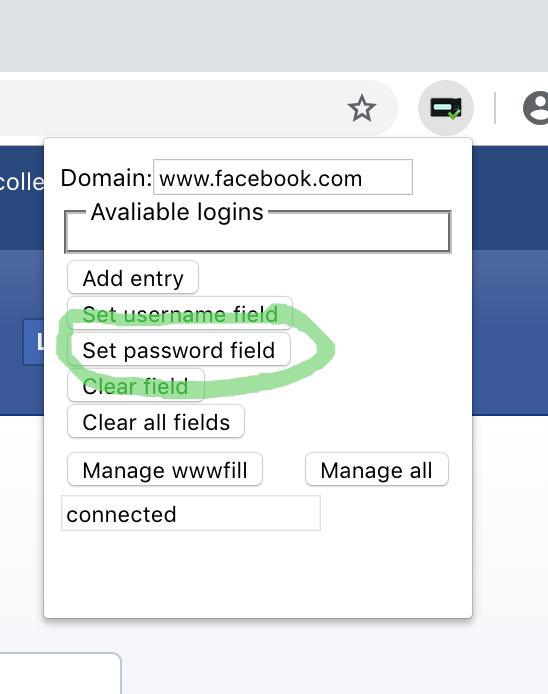
Then open the plugin via the Seclave icon and press either Set username field or Set password field.
To remove a mapping click on the field and choose Clear field, or to Clear all fields to remove all fields on this domain.
Use entries
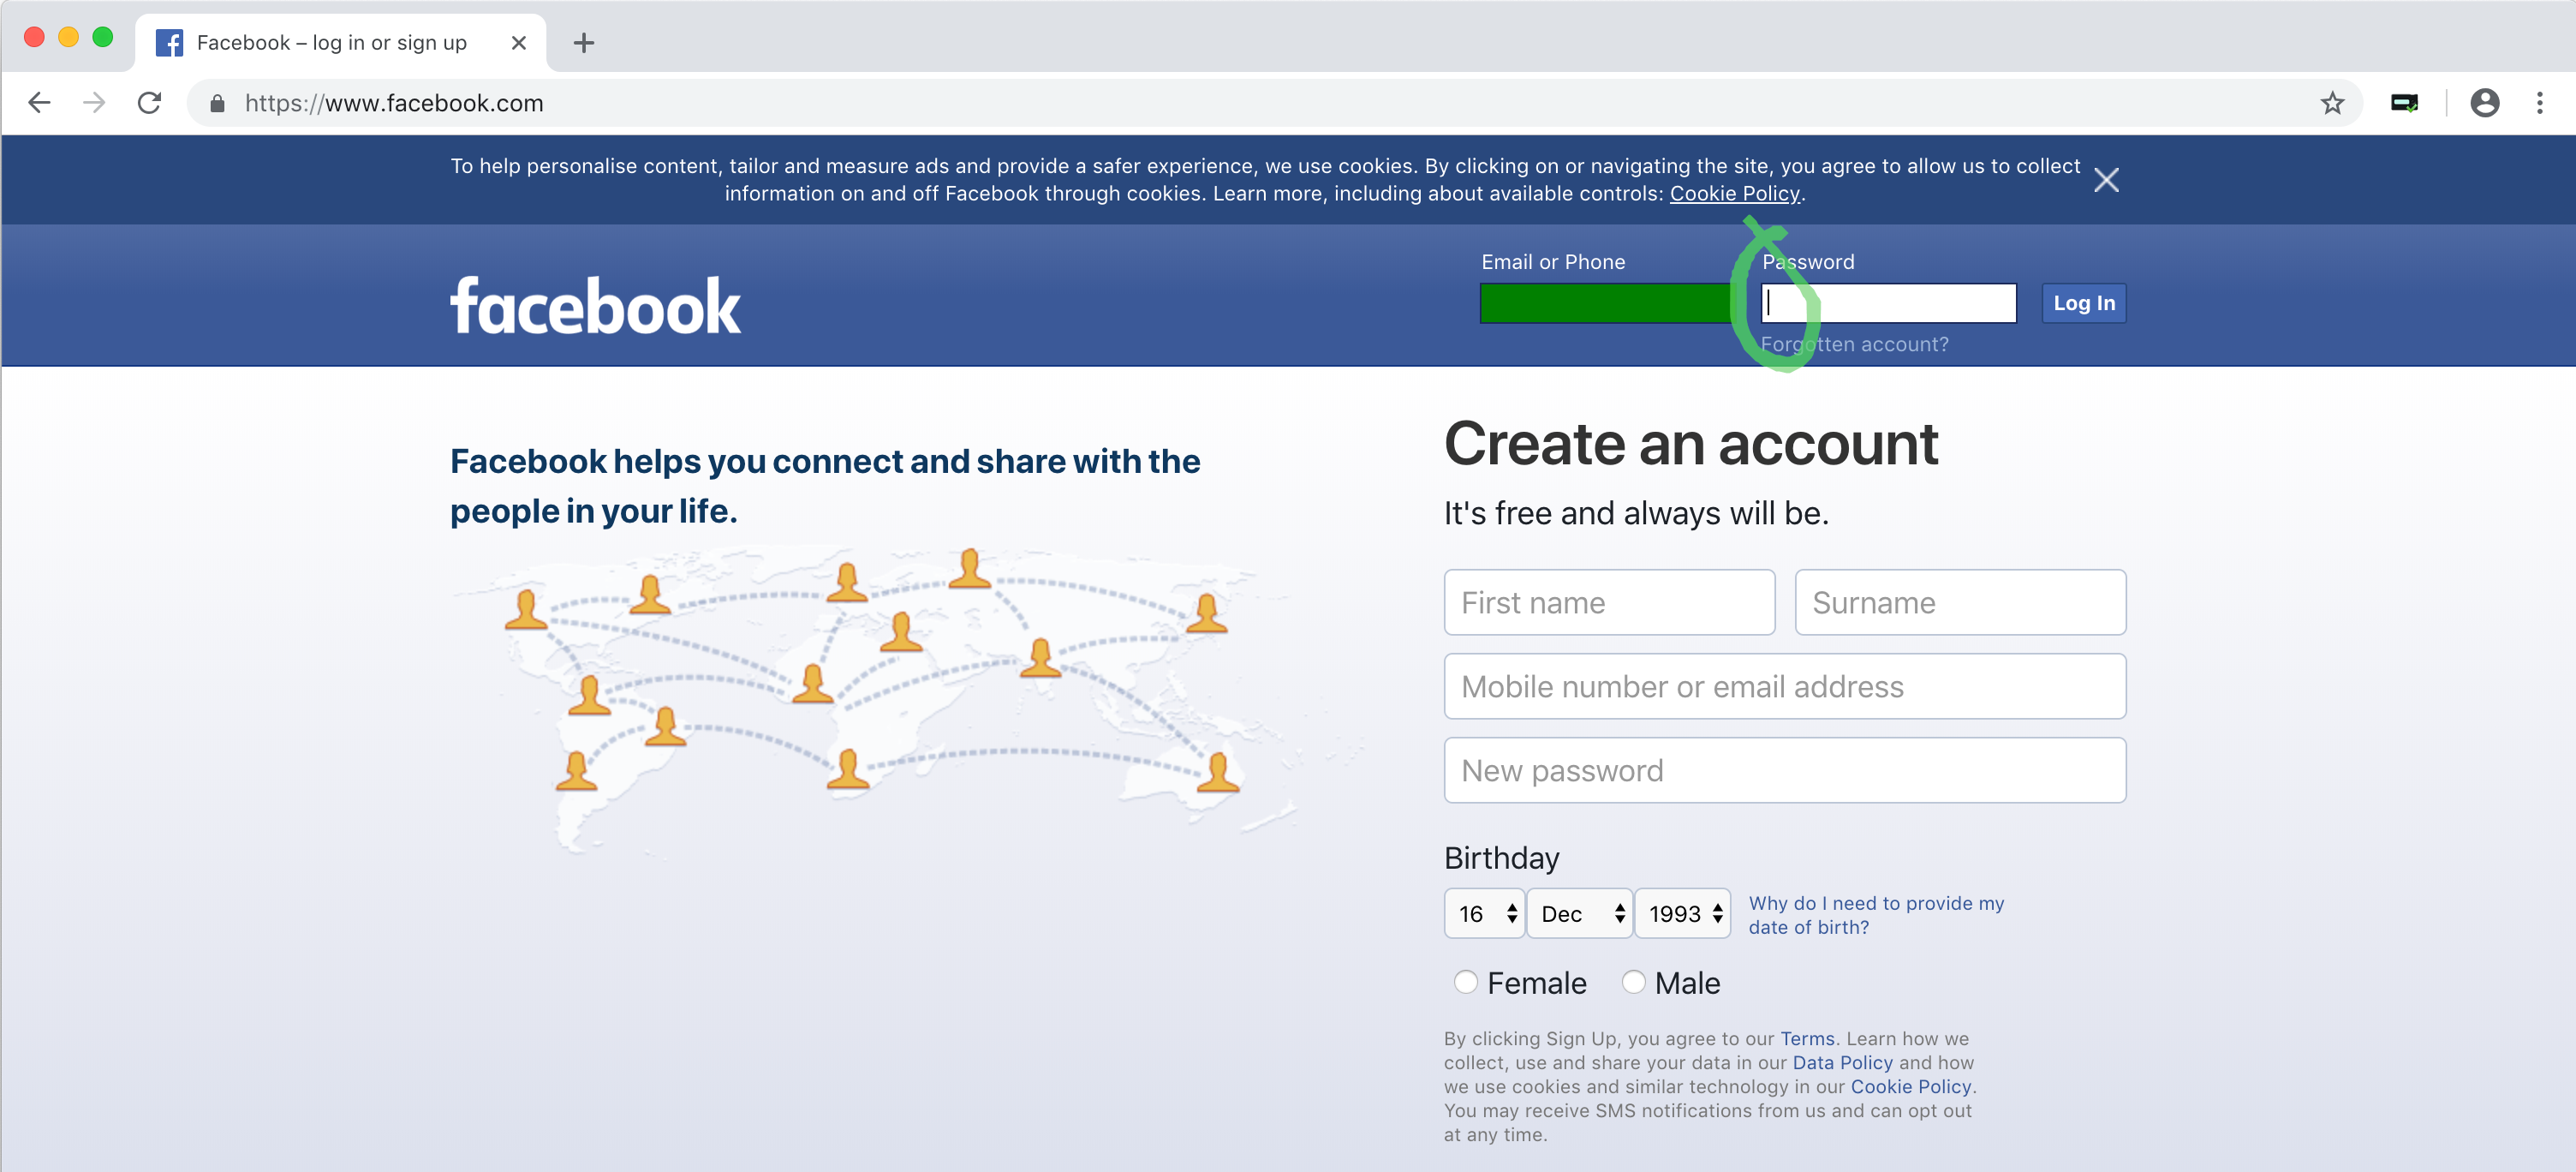
Fields that will have their input filled are colored with green background for usernames and red background for passwords when opening the popup.
When clicking on a login in the Available logins its values will be inserted into the green and red fields.